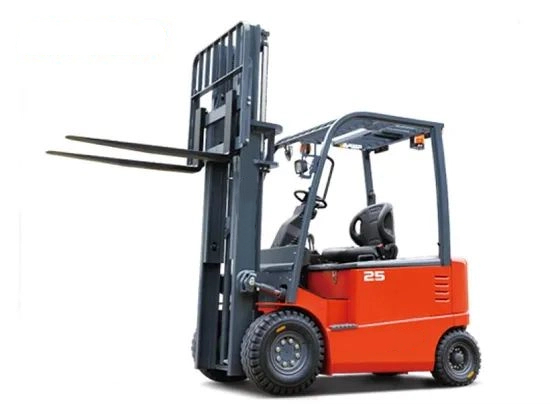
Installing an electric forklift unit requires strict adherence to safety standards, technical specifications, and operational requirements. This guide breaks down the process into pre-installation preparation, core installation steps, post-installation testing, and key safety & maintenance notes to ensure a smooth and compliant setup.

1. Pre-Installation Preparation
Adequate preparation is critical to avoid delays, safety hazards, or equipment damage. Focus on three core areas: site assessment, tool/equipment readiness, and personnel qualification.
1.1 Site Assessment & Preparation
The installation site must meet the electric forklift’s operational and power requirements. Conduct a detailed check of:
- Power Supply Compatibility:
- Confirm the site’s electrical system matches the forklift’s voltage (e.g., 24V, 48V, 80V) and current rating. Install a dedicated circuit breaker (with overload protection) to avoid power fluctuations affecting other equipment.
- For battery-powered units: Plan a battery charging station (if not integrated) with proper ventilation (to disperse hydrogen gas during charging) and fire suppression (e.g., ABC dry chemical extinguishers).
- Space Requirements:
- Ensure the installation area has a minimum clearance of 1.5 meters around the forklift (for maintenance and operator movement) and a flat, level floor (load-bearing capacity ≥ the forklift’s total weight, including maximum load).
- Remove obstacles (e.g., pipes, wiring, debris) and mark walkways/operation zones with safety tape or paint.
- Environmental Conditions:
- Avoid areas with extreme temperatures (≤ 40°C / ≥ 0°C, unless the forklift is rated for harsh environments), high humidity (> 85%), or exposure to corrosive substances (e.g., chemicals, saltwater).
1.2 Tool & Equipment Readiness
Gather all required tools and auxiliary equipment to avoid interruptions:
| Category | Essential Items |
|---|---|
| Hand Tools | Torque wrench (calibrated), socket set, screwdrivers, wire strippers, pliers |
| Power Tools | Electric drill (with masonry bits for floor anchoring), angle grinder |
| Safety Gear | Hard hat, safety glasses, insulated gloves, steel-toe boots, ear protection |
| Auxiliary | Forklift jack/hoist (for lifting heavy components), level gauge, cable ties, insulation tape |
| Documentation | Forklift user manual, electrical schematic, local safety codes (e.g., OSHA, IEC) |
1.3 Personnel Qualification
Only trained and certified personnel should perform installation:
- Operators must hold a valid electric forklift operation certificate.
- Electricians must be licensed to work with the forklift’s voltage class (e.g., low-voltage for 24V/48V units).
- All personnel must complete a safety briefing on forklift hazards (e.g., battery acid, moving parts) and emergency protocols.
2. Core Installation Steps
Follow this step-by-step process to install the electric forklift unit (battery-powered or fuel-cell; focus on battery-powered here, the most common type):
Step 1: Unload & Position the Forklift
- Use a crane or forklift hoist (rated for the unit’s weight) to unload the forklift from the delivery truck. Never drag or tip the unit—this can damage internal components (e.g., motor, battery).
- Position the forklift on the pre-prepared flat floor. Use a level gauge to confirm it is perfectly horizontal (deviations can cause uneven tire wear or operational errors).
Step 2: Install the Battery (Critical for Battery-Powered Units)
- Safety First: Wear acid-resistant gloves, goggles, and a face shield. Place a spill kit (neutralizing agent, absorbent pads) nearby to handle battery acid leaks.
- Battery Lifting: Use a dedicated battery hoist (never a regular crane) to lower the battery into the forklift’s battery compartment. Align the battery’s terminals with the forklift’s wiring harness (refer to the electrical schematic to avoid reverse polarity).
- Secure the Battery: Fasten the battery with locking bolts or straps (provided by the manufacturer) to prevent shifting during operation. Loose batteries can damage wiring or cause the forklift to tip.
- Connect Terminals: Attach the positive (+) cable to the battery’s positive terminal first, then the negative (-) cable to the negative terminal. Tighten terminals with a torque wrench (follow manufacturer specs—over-tightening can strip threads). Cover terminals with insulated caps to prevent short circuits.
Step 3: Electrical System Connection
- Connect the forklift’s main power cable to the dedicated circuit breaker (ensure the breaker is in the “OFF” position first).
- Route auxiliary cables (e.g., for lights, horn, control panel) through cable channels to avoid pinching or exposure to moving parts. Secure cables with cable ties (leave slight slack for vibration).
- Double-check all connections against the electrical schematic: Ensure no wires are crossed, and all ground wires are properly connected to the forklift’s chassis (poor grounding can cause electrical faults).
Step 4: Install Attachments (If Required)
- For forklifts with optional attachments (e.g., side shifters, clamps), mount them to the fork carriage using the manufacturer’s hardware. Align the attachment’s hydraulic/pneumatic ports with the forklift’s hoses (if hydraulic).
- Tighten all bolts to the specified torque (use a calibrated torque wrench) and test attachment movement manually to ensure no binding.
Step 5: Chassis & Tire Inspection
- Inspect the forklift’s chassis for loose bolts or damage (e.g., dents from shipping). Tighten any loose fasteners (e.g., wheel nuts, frame bolts) to manufacturer standards.
- Check tire pressure (for pneumatic tires) or tread condition (for solid tires). Adjust pressure as needed—underinflated tires reduce stability, while overinflated tires cause rough operation.
3. Post-Installation Testing & Calibration
After installation, thoroughly test the forklift to ensure safety and functionality. Never skip this step—undetected issues can lead to accidents.
3.1 Electrical System Testing
- Turn on the main circuit breaker and forklift power switch. Check the control panel: All indicator lights (battery level, fault codes) should illuminate correctly (no error messages).
- Test the battery charger (if integrated): Connect the charger to the battery and confirm it starts charging (charger indicator shows “Charging” mode). Monitor for 10 minutes to ensure no overheating (charger case should be warm, not hot).
3.2 Operational Function Testing
Perform tests in an empty, enclosed area (no personnel nearby) to simulate real-world use:
- Steering: Turn the steering wheel left/right to full lock—ensure smooth movement with no play or stiffness. Check that the forklift follows the steering path accurately.
- Acceleration & Braking:
- Test forward/reverse movement at low speed: Accelerate gradually—no jerks or delays.
- Apply the brake pedal firmly: The forklift should stop quickly and evenly (no pulling to one side). Test the emergency brake (parking brake) by stopping on a slight incline (≤ 5°)—it should hold the forklift in place.
- Lifting & Lowering:
- Raise the forks to maximum height (no load)—ensure smooth movement, no unusual noises (e.g., grinding), and the lift cylinder does not leak hydraulic fluid.
- Lower the forks slowly—confirm the lowering speed is consistent (no sudden drops).
- Safety Features: Test the horn, headlights, taillights, and backup alarm—all should work correctly. Activate the emergency stop button— the forklift should shut down immediately.
3.3 Calibration (If Needed)
- Use the manufacturer’s calibration tool (e.g., a diagnostic tablet) to adjust parameters like lift speed, steering sensitivity, or battery charge cutoff.
- For forklifts used in precision applications (e.g., warehouse order picking), calibrate the fork position sensor to ensure accurate load placement.
4. Safety & Maintenance Notes
4.1 Key Safety Rules
- Never operate the forklift without completing post-installation testing.
- Keep the battery charging area well-ventilated—hydrogen gas (released during charging) is flammable. No smoking or open flames nearby.
- If battery acid spills, neutralize it with baking soda (sodium bicarbonate) and clean up with absorbent pads. Do not use water—acid can splatter.
- Lock out/tag out (LOTO) the forklift before performing maintenance (e.g., battery replacement) to prevent accidental startup.
4.2 Post-Installation Maintenance
- Daily Checks: Inspect battery terminals (for corrosion), hydraulic hoses (for leaks), and tires (for damage) before each use.
- Weekly Checks: Tighten loose bolts (e.g., fork bolts, chassis bolts) and lubricate moving parts (e.g., steering joints, lift chains) with the manufacturer-recommended lubricant.
- Monthly Checks: Test the battery’s state of charge (use a multimeter) and clean the battery terminals (with a wire brush and baking soda solution) to prevent corrosion.
5. Common Installation Mistakes to Avoid
- Reverse Polarity: Connecting the battery’s positive cable to the negative terminal can damage the forklift’s motor or control panel. Always refer to the electrical schematic.
- Inadequate Power Supply: Using a non-dedicated circuit can cause voltage drops, leading to poor performance or charger failure.
- Overlooking Ventilation: A poorly ventilated charging area increases the risk of hydrogen gas buildup and fire.
- Skipping Torque Specifications: Over-tightening bolts can strip threads; under-tightening can cause parts to come loose during operation.
By following this guide, you can ensure the electric forklift unit is installed safely, compliantly, and ready for reliable operation. Always consult the forklift’s user manual for model-specific instructions—different manufacturers may have unique requirements.


